Guide — Migrations
Overview
The Endpoint Migration API allows you to move endpoints in bulk from one tenant to another. Windows computers and servers, Macs, and Linux endpoints are all supported.
Note: We've temporarily disabled endpoint migration for Windows endpoints due to an issue identified in the 2023.2 agent version. This pause affects all Windows endpoints until April 1, 2024. After April 1, migration will be re-enabled for all Windows endpoints except those on the 2023.2 version. To migrate endpoints running the affected agent version, switch them to a fixed term support package.
Pre-requisites
You must have a set of API credentials (service principal) to be able to call the Endpoint API. For more information refer to the appropriate quick start guide:
- Sophos Partners: Read the Partner Getting Started guide first.
- Enterprise customers: If you use Sophos Enterprise to manage multiple tenants, read the Organization Getting Started guide first.
- Other customers: Read the Tenant Getting Started guide first.
Note: Your API credentials must have the "Service Principal Super Admin" role for API calls to succeed.
Terminology
- Sending Tenant: The tenant that has the endpoints you want to move.
- Receiving Tenant: The tenant that you want to move the endpoints to.
Making API requests
You can make the API calls in the next few sections using cURL. Follow the instructions on cURL's website to install this tool.
When using curl, a request to the Endpoint API has the following general form:
curl -X<method> -H "Authorization: Bearer <jwt>" -H "X-Tenant-ID: <tenant-id>" <data-region>/<path>
The command includes the following placeholders:
<method>: The request method. For the Endpoint API, this is eitherGETorPOST.<tenant-id>: The ID of the tenant you want to query.<jwt>: The JWT access token returned when the IDP authenticates the service principal.<data-region>: The regional API host in the data geography where the tenant data is located.<path>: The request path for the API operation, for exampleendpoint/v1/migrations.
For brevity, the API descriptions in this guide only specify the request method and path. For example:
POST /endpoint/v1/migrations
To make an actual API request, you must expand this to the full form shown above.
All API requests return HTTP status codes 200 or 201 when successful.
Perform a migration
1. Turn on device migration for the sending tenant
- Sign in to the Sophos Fusion account you want to migrate computers from.
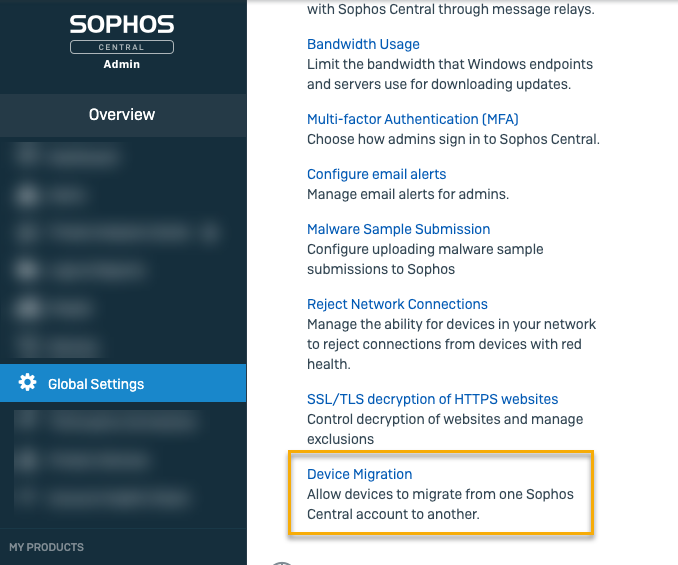
- Go to Overview > Global Settings > Device Migration.
- Turn on Allow device migration.
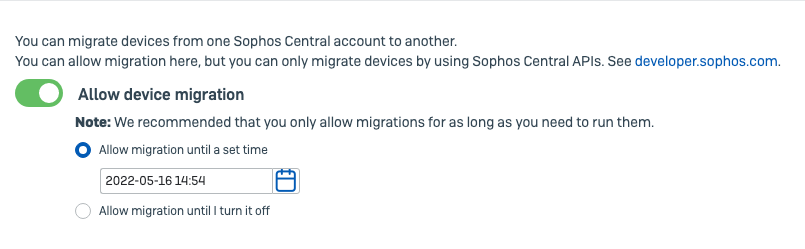
- Set a time limit for migrations. We recommended that you allow migrations for a limited time period.
- Save the settings.
2. Create a migration job for the receiving tenant
Let's assume you want to migrate two endpoints from Tenant A (with the ID "d7bf25c7-c62e-4790-8c11-0ff067d4915f") to Tenant B (with the ID "9a3d9485-f4d3-4348-b7ed-797c06b0c0e3"). In this case, Tenant A is the "sending tenant" and Tenant B is the "receiving tenant".
The following API call may be invoked by a service principal belonging to Tenant B or an organization that both tenants are part of.
API: POST /endpoint/v1/migrations
Headers:
Authorization: Bearer <jwt>X-Tenant-ID: 9a3d9485-f4d3-4348-b7ed-797c06b0c0e3- ID of the receiving tenant (Tenant B)
Request body:
{
  "fromTenant": "d7bf25c7-c62e-4790-8c11-0ff067d4915f",   // Required. Identify the sending tenant.
  "endpoints": [                                          // Required. Supply endpoint IDs in the sending tenant.
    "da3eb33c-51c9-4b72-a61e-e68bf9e51fd5",
    "384176b4-1fde-4b63-92b4-7900b81d2807"
  ]
}
Response:
This returns a migration job. The job contains a token that will be used to initiate the migration from the sending tenant.
{
  "id": "ca09ed8c-f48b-4e02-bd63-ceac3bcca9c7",                 // Unique ID for the migration job
  "token": "eyJmb28iOiAiVGhpcyBpcyBhIHNhbXBsZSB0b2tlbiIgfQ==",  // Token to be used by the sending tenant
  "mode": "receiving",                       // Migration job mode.  In this case it will be `receiving`
  "createdAt": "2022-06-21T20:24:12.429Z",   // When the job was created
  "createdBy": { ... },                      // Who created the job
  "expiresAt": "2022-06-22T20:24:12.429Z"    // When the job expires. The migration must be initiated before this time.
}
3. Trigger the migration from the sending tenant
API: PUT /endpoint/v1/migrations/{migrationJobId}
For example, PUT /endpoint/v1/migrations/ca09ed8c-f48b-4e02-bd63-ceac3bcca9c7
Headers:
Authorization: Bearer <jwt>X-Tenant-ID: d7bf25c7-c62e-4790-8c11-0ff067d4915f- ID of the sending tenant (Tenant A)
Request body:
{
  "token": "eyJmb28iOiAiVGhpcyBpcyBhIHNhbXBsZSB0b2tlbiIgfQ==",   // Required. The token returned by the receiving tenant
  "endpoints": [                                      // Required. Endpoints eligible for migration using the token above.
    "da3eb33c-51c9-4b72-a61e-e68bf9e51fd5",
    "384176b4-1fde-4b63-92b4-7900b81d2807"
  ]
}
Response:
This returns a migration job. This contains the migration job ID for the sending tenant, which can be used subsequently to query for status.
{
  "id": "ca09ed8c-f48b-4e02-bd63-ceac3bcca9c7",                 // Unique id for the migration job
  "token": "eyJmb28iOiAiVGhpcyBpcyBhIHNhbXBsZSB0b2tlbiIgfQ==",  // Token being used by the sending tenant
  "mode": "sending",              // Migration job mode.  In this case it will be `sending`
  "createdAt": "2022-06-21T20:35:06.377Z",   // When the job was created
  "createdBy": { ... },                      // Who created the job
  "expiresAt": "2022-06-22T20:35:06.377Z"    // When the job expires. The migration must be completed before this time.
}
4. Check status of migrating endpoints
Check the status on both the sending and receiving tenant.
API: GET /endpoint/v1/migrations/{migrationJobId}/endpoints
For example, GET /endpoint/v1/migrations/ca09ed8c-f48b-4e02-bd63-ceac3bcca9c7/endpoints.
Headers:
Authorization: Bearer <jwt>X-Tenant-ID: 9a3d9485-f4d3-4348-b7ed-797c06b0c0e3- ID of the receiving tenant (Tenant B) or the sending tenant (Tenant A)
Response:
This returns a paginated list of objects, each of which indicates the status of one of the endpoints being migrated.
{
  "items": [
    {
      "id": "da3eb33c-51c9-4b72-a61e-e68bf9e51fd5",    // The endpoint ID in the sending tenant
      "status": "succeeded",                           // The status of the migration for this endpoint.
                                                       // This may also be `pending` or `failed`.
      "newId": "5293d959-f53e-434b-bd5d-abd15d3b7a95", // The new endpoint ID, in the receiving tenant
      "migratedAt": "2022-06-21T20:37:55.528Z"         // The time at which the endpoint migrated. Not present
                                                       // if the migration is pending or has failed.
    },
    {
      "id": "384176b4-1fde-4b63-92b4-7900b81d2807",
      "status": "failed",
      "failedAt": "2022-06-21T20:36:02.776Z",              // The time the endpoint failed to migrate. Unset if has not failed
      "reason": "Agent version doesn't support migration"  // Why the migration failed
    }
  ],
  "pages": {
    "current": 1,                               // Current page
    "size": 50,                                 // Page size
    "total": 1,                                 // Total number of pages
    "items": 1,                                 // Total number of items across all pages
    "maxSize": 200                              // Maximum page size that can be requested
  }
}
Fetch the next page of results passing in page=2 as a query param.
API: GET /endpoint/v1/migrations/ca09ed8c-f48b-4e02-bd63-ceac3bcca9c7/endpoints?page=2&pageTotal=true.
Conclusion
After reading this guide, you should be able to use the new API routes in the Endpoint API to migrate endpoints from one tenant to another.